
CSV Uploader Tool: Identify Columns (4/5)
Once you’ve selected a publications file, you must select which type of data is represented by each column in your publications spreadsheet. This looks like:

The left-hand column lists your publications spreadsheet column headers as you’ve written them. The middle column (“Type of Data”) provides drop-down menus which allow you to select what each column contains.
A data sample is shown on the right. The data sample always automatically shows the first row of data in your publications spreadsheet. Note that on the top right, you can use the arrows to scroll through all rows of your spreadsheet. The green tick marks on the right indicate that the data are in a supported format.
For each CSV column, select one of the following types of data:
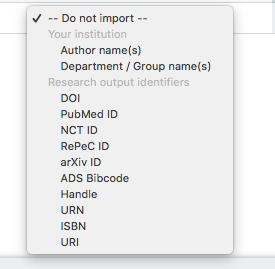
Your options are:
Do not import: Choose this option if the column represents unrelated data (for example, staff ID numbers) which are not authors, departments, or supported scholarly identifiers.
Author name(s): Choose this option if the column contains one or more author names separated by semicolon (as described above). You can have multiple columns containing author names.
Department/Group name(s): Choose this option if the column contains department/group names. Remember that the format and spelling of the department/group names in your publications spreadsheet must exactly match the format in your group hierarchy spreadsheet (which you will have uploaded in Step 1). You can have multiple columns containing department names.
Identifiers: Select one of the 10 supported types of identifiers for each identifier column. Remember that each identifier column should contain *only one* type of identifier.
Once you verified your columns, Check Your Results